|
Install mpmX |
Scroll Previous Topic Top Next Topic More |
Requirements
Install Qlik Sense®
In order to use MEHRWERK ProcessMining, a Qlik Sense® environment is neccessary.
Before installing, it's important to decide which version of Qlik Sense® is best suited. You can find an overview of the different versions and explanations for each installation in the Qlik help.
Qlik Sense® releases & deployments
•By default, all Qlik Sense® versions of the last 12 months are supported
•The deployment on Qlik Sense® Enterprise on Windows is fully supported.
Supported browsers
•Apple Safari 10 or later
•Google Chrome (recommended)
•Mozilla Firefox (requires a hardware acceleration, not supported in virtual environments)
How to install mpmX
1. Download your mpmX bundle
The installation bundle can be downloaded in the mpmX Support Portal https://portal.mehrwerk.net/.
•Login to the support portal
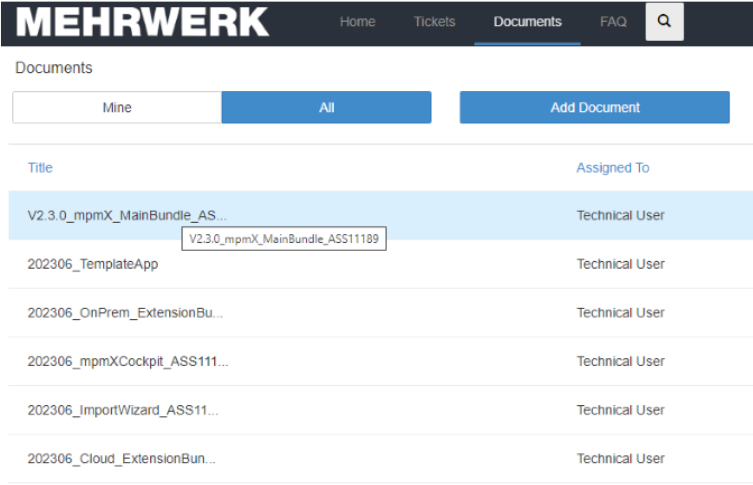
•Navigate to the section Documents and select "All" as shown in the screenshot below.
•Download all the installation files from the latest release.

Install mpmX Bundle
The ZIP-file [[version]]_mpmX_MainBundle_ASS12345.zip is provided with the following content:
•mpmX_apps
ompmX TemplateApp [[version]].qvf
ompmX TemplateApp Wizard [[version]].qvf
ompmX TaskApp [[version]].qvf
•mpmX_data
oevent_logs
ompmXData.qvd
ompmXData4OCPM.qvd
oprocess_analytic_models
•mpmX_repository
o_templates
ompmX_config_repository.qvs
ompmX_config_repository.xlsx
ompmX_datamodel_translations.xlsx
ompmX_holiday_calendar_germany.csv
o mpmX_masteritem_translations.csv
ompmX_masteritems.csv
o ExampleProcess
•mpmX_scripts
o<<version>>
ocustomizing
▪_templates
•custom_variables.qvs
•custom_logic_*.qvs
▪ExampleProcess
ompmX_impl
▪core scripts (DO NOT CHANGE)
ompmX_api.qvs
•mpmX_Cloud_Extensions_[[Assetnumber]]
•mpmX_Cockpit_[[Assetnumber]]
•mpmX_ImportWizard_[[Assetnumber]]
•mpmX_OnPrem_Extensions_[[Assetnumber]]
The mpmX_[[Deployment]]_Extensions_[[Assetnumber]].zip includes:
•AppObjectImporter
•BasicFunctions
•BPMNModeler
•DialogBox
•GroupedContainer
•GuidedTour
•LeadTimeFilter
•MasterScript
•mpmXTheme
•NGProcessActivityFilter
•ProcessAnalyzer
•ProcessModeler
•ProcessVariantsInspector
•QueryBuilder
•StateToStateButton
The mpmX_ImportWizard_[[Assetnumber]].zip includes:
•BPMNImportWizard
•ImportWizard
The mpmX_Cockpit_[[Assetnumber]].zip includes:
•mpmXCockpit
2a. Install mpmX on Prem
(see 2b. for Cloud installation)
1.Create the following folder structure in your fileshare by copying the folders received in the installation bundle:
•mpmX ProcessMining
ompmX_data
ompmX_repository
ompmX_scripts
•Create sub folders with [[mvProcessDescription]] in mpmX_repository/[[mvProcessDescription]] and mpmX_scripts/customizing/[[mvProcessDescription]]
2.Import the mpmX_OnPrem_Extensions_[[Assetnumber]].zip via the mpmX QMC (https://[[serverURL]])
3.Import the mpmX TemplateApp/Apps via the mpmX Management Console (QMC). The apps need to be imported individually.
|
Optional Tip: For better management of the extensions you can create an “mpmX” tag. To do so, follow these steps: •Go to the “Tag” section in the qmc (https://[[serverURL]]/qmc/tags) •Create a new tag and name it “mpmX” •Go back to the extension section and select all the extensions you just imported and click “Edit”. Then go to “Tags” on the right side and add “mpmX”. From now on you can use the tag to filter on all mpmX extensions. You can also apply the tag for the imported apps. |
2b. Install mpmX in the Cloud
There are multiple ways to create the following folder structure on a fileshare such as Sharepoint or AWS S3 Bucket. We recommend a Sharepoint folder if you have O365, because it is easy to set access rights and you can edit the scripts locally on your laptop and it will be synced to the cloud.
•mpmX_data
•mpmX_repository
•mpmX_scripts
1.First extract the files from mpmX_Cloud_Extensions_[[Assetnumber]].zip and then import every individual extension zip file (except the mpmXTheme) via the mpmX management console (https://[[serverURL]]/console/extensions). Click “Add” and then select the extension you want to import.
It is also recommended to use “mpmX” as a tag to better manage the extensions further on.
2.Go to https://[[serverURL]]/console/themes and then click “Add” and select the “mpmXTheme”.
Use “mpmX” as a tag.
3.Import the mpmX TemplateApp/Apps via the mpmX hub. The apps need to be imported individually. Click “Add new” and then select “Upload”. Choose the app you want to import and select the space you want to import it too.
Add the tag “mpmX” and click “Upload”.
3a. Set up the mpmX Template App [[Version]] (OnPrem)
(see 3b. for Cloud instructions)
1.Go to the Hub and open the mpmX Template App [[Version]]
2.Open the data load editor by clicking on "Prepare |Data load editor"
3.Create an mpmX data connection:
(Repeat this step for mpmX_scripts, mpmX_repository and mpmX_data)
a)Click “Create new connection” on the top right side
b)Search for the location where you stored the related folder (e.g. mpmX_data) during the installation and select the folder
c)Name the connection accordingly (e.g. mpmX_data)
d)Go to the QMC https://[[serverURL]]/qmc/dataconnections (if possible) and double click on the newly created data connection and change the connection name by deleting the user ID from the connection name
e)Give the required users access rights to this data connection by adding an according security rule
4.Click “Load data” and the app should be reloaded with the test data set
5.Configure the template app to your needs and load in your own data
3b. Set up the mpmX Template App [[Version]] (Cloud)
1.Go to the hub and open the mpmX Template App [[Version]]
2.Open the data load editor by clicking on “Prepare |Data load editor”
3.Create an mpmX data connection
(Repeat this step for mpmX_scripts, mpmX_repository and mpmX_data)
a.Click “Create new connection” on the top right side
b.Search for the location where you stored the related folder (e.g. mpmX_data) during the installation and select the folder
c.Name the connection accordingly (e.g. mpmX_data)
d.Give the required users access rights to the space to allow them to use the data connection
4.Click “Load data” and the app should be reloaded with the test data set
5.Configure the template app to your needs and load in your own data
