|
Perform Conformance Checking on Your Process Mining Data |
Scroll Previous Topic Top Next Topic More |
Conformance Checking is an optional module in MPM and will unlock the analysis in the sheet Conformance Checking. To execute the Conformance Checking algorithm two input options are provided. A BPMN model can be imported via the MPM BPMN Import Connector or the happy paths are created and entered manually. When using several self-defined happy paths, the table HappyPathTable must be adjusted in the data load editor in the MPM App.
Do the following steps to enable the conformance checking module:
1.Go to the script editor of the MPM Template App.
2.Go to the script tab 4. Conformance_Checking.
3.In the script tab you will find the three sections
a)USE THE BPMN IMPORT (Option 1)
b)CREATE HAPPY PATHS MANUALLY (Option 2)
c)NAME THE HAPPY PATHS
|
Option 1 and Option 2 can be used combined - just follow the steps as usual. |

Option 1:
Do the following steps to import a BPMN model:
|
The BPMN import only supports OR-gateways. An AND-gateway will be converted to an OR-gateway by the algorithm. |
1.Connect to the BPMN model:
d)Click Create a new connection.
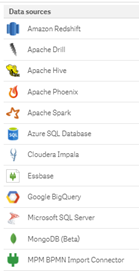
e)Search for “MPM BPMN Import Connector” under data sources on the right panel and select the connector.
a)Enter a connection name.
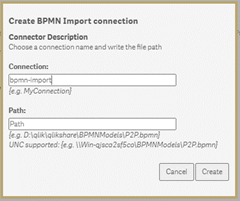
f)Enter the complete path, including file name, where the .bpmn file is located on the Qlik Sense server.
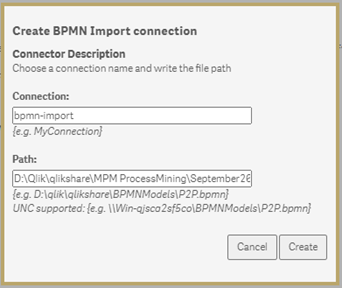
|
The files need to be stored on the Qlik Sense server itself. |
Example:
D:\Qlik\qlikshare\MPM ProcessMining\September2020\BPMN Import\BPMN Example File\P2P.bpmn
|
UNC is also supported: Win-qjsca2sf5co\BPMNModels\P2P.bpmn |
5.Copy and paste the name of the connection in the variable mvBPMNConnectionName.
g)Set the variable mvUseBPMNImport to 1.
Example:
Let mvUseBPMNImport = 1;
a)Set the variable mvBPMNConnectionName to the name you gave to the connection.
Example:
Let mvBPMNConnectionName = 'bpmn-import';
6.Create a Mapping Table.
a)Probably the BPMN events, tasks and gateways don’t have the same name as the activities in the application.
Therefore, a Mapping table must be created. You can find an example in the file BPMNMappingTable.xlsx saved in the license share under <ReleaseFolder>/BPMN Import/MappingTables.
|
The activity names are case sensitive. |

b)Write the exact name of your activity in the model in the column ActivityBPMN and the exact name of the activities in the MPM model in the column ActivityMPM. If you have mapping from BPMN to MPM activities fill the column map with an 'x'.
| If you do not have an activity in MPM to which you can map the BPMN activity write the BPMNActivity-name in the colum ActivityMPM and leave the colum map empty. Then you will see the BPMN activity in red on the analyzer as a skipped activity. |
| If you do not want to see an activity from the BPMN then write an 'x' in the column ExcludeBPMNActivity. |
ActivityBPMN |
ActivityMPM |
ExcludeBPMNActivity |
map |
Insert ticket |
Insert ticket |
|
x |
waiting |
Wait |
|
x |
release |
release |
|
|
second check |
|
x |
|
7.Fill in the table HappyPathDescription_$(mvProcessDescription)
a.Use the exit script in line 32 to control, which happy paths have been created from the BPMN model and which IDs they were given.
All Happy Paths of the BPMN Model get HappyPathIDs starting with 100 and counting up.
b.Fill in the table HappyPathDescription with the HappyPathIDs and a short description of the new BPMN paths which will be shown in the front end.
|
If you want to use manually created happy paths, proceed with step 9. If you don't want to use manually created happy paths, make sure that the HappyPathTable is empty. |
Option 2:
Do the following steps to create valid happy paths manually (happy paths can be entered even if bpmn-import is used):
8.Open the Process Modeler worksheet.
9.Define a happy path with the MPM ProcessModeler and click Save.
10.Press the Edit button.
11.Click on the ProcessModeler.
12.Open the settings area on the right in the properties and copy the Resulting HappyPath.
13.Insert the ProcessPath into the HappyPathTable: HappyPathUniqueNo, HappyPaths.
14.If the Process Path is valid only for a data subset, e.g. a specific company code and a purchase organization, enter a valid where filter in the field RelatedDimensions.
The dimensions used in the where filters need to be in the case context table, which is indicated in the field RelatedDimensionTable.
If some happy paths are related to a dimension and some not, those which do not provide a where filter will be applied to every case which is not included by non of the RelatedDimension filters.
Leave the fields "RelatedDimensions" and "RelatedDimensionTable" empty, if you do not need them.
HappyPathTable:
load * inline
[HappyPathUniqueNo,HappyPaths, RelatedDimensions, RelatedDimensionTable
0, 0-103-101-118-119-126-99999999, CompanyCode = '1000' and PurchaseOrganization = 'E12', CaseInformation
1, 0-103-104-118-119-126-99999999, CompanyCode = '1000' and PurchaseOrganization = 'A20', CaseInformation
2, 0-102-103-117-119-126-190-99999999,
];
15.Insert a HappyPathDescription for the happy path. If you have used the BPMN import as well, just add the manually created happy paths to the description table.
[HappyPathDescription_$(mvProcessDescription)]:
load * inline
[HappyPathID,HappyPathDescription
0, Process for Purchase Organization E12
1, Process for Purchase Organization A20
2, Process for other Purchase Organizations
];
16.Repeat steps 4 to 10 for each wanted happy path.
The next time the app is loaded, a conformance check is automatically performed on the new happy paths. The results are available for analysis in the Conformance Checking worksheet.