|
Deploy MPM Rules and Actions |
Scroll Previous Topic Top Next Topic More |
The MPM eXecution module MPM Rules and Actions offers the following functionalities:
•Create actions automatically with MPM according to a pre-defined set of rules
•Create actions automatically from the Root Cause Analysis' results
•Create actions ad-hoc in the front-end based on analytical insights
The advantageous of the MPM Rules and Actions module are, that you consolidate the process analytics and the task management in one single point. You can convert root causes of anomalies into actions so that they get the required attention immediately. You create, assign and track tasks in the front-end by administering the assigned users, the due dates, the execution status and evaluate if the actions has resulted in process improvement.
Before you can activate the MPM eXecution module, you need to deploy the MPM eXecution Template App with your data: Deploy the MPM eXecution Template App.
1.You need to create the write back table for this module in the MPM eXecution data base. Therefore, follow these steps:
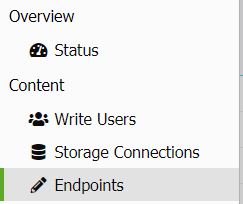
a.Go to the management console and navigate to the section Endpoints.
b.Click on the button New Edit Endpoint in the lower right corner.
c.Fill the dialog that has opened as follows.
Choose your database connection instead of the one displayed in the screenshot.
You may change the endpoint name (e.g. to refer to a certain customer project) but then you will need to change the load-statements in the MPM eXecution Template App's load.
|
It is important to always save the full row! |


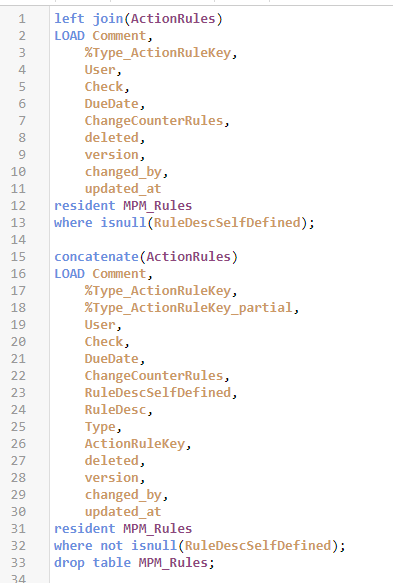
You may like to copy the technical and database fieldnames from this list:
a.Comment (string)
b.RuleDesc (primKey - string)
c.Type (primKey - string)
d.ActionRuleKey (primKey - string)
e.User (string)
f.Check (number)
g.DueDate (date)
h.ChangeCounter (number)
i.RuleDescSelfDefined (string)
Check in the data base if the tables we_fullData_MPM_Rules, we_data_MPM_Rules, we_fullHistory_MPM_Rules and we_history_MPM_Rules were created correctly.
2.Go back to the MPM eXecution Template App. Open the tab 0C. Init Module Actions. The script here is written as comment, thus, to activate it press STRG+A and click the comment-button in the upper left corner.
a.Go to the table UserTable and enter the users to who you want to assign actions. Enter a valid e-mail if you want to make use of the mailing functionality.
|
In the template the user list is provided inline. Of course you can connect a file containing the information or the AD to get the users and their mails. |
b.Check the MPM_Rules-table load - configure the from-statement to correctly connect to your database table - if you load from a postgres-database's public owner and did not have changed the endpoint name MPM_Rules you can use the template as-is..
3.Go to the tab 5. eXe: Root Cause Analysis and activate the method-call mw_concate_rca_results_to_actions. Thus, the insights found by the RCA are directly converted into actions.
call mw_concate_rca_results_to_actions('ActionRules');
4.Drag and drop the tab 12. Update Actions behind 10. eXe: LOAD DATA MODEL. If you want to send e-mails to the person assigned to an action, configure the mailing following these steps: Send Action Items via Email. If you do not want to send e-mails, comment the lower part of the script and only keep this script part activated:
5.Now you need to define action items that you want to assign to the users. Therefore, follow the steps described here: Create Actions and Tasks with the Rule Engine
6.Once the action item rules are defined, run the script. The script will run in the normal mode.
7.Go to the app front-end and import the master items.
8.Go to the sheet Assign Actions - you will see that currently the endpoint in your edit-visualizations are incorrect:
 |
Open the Assign Action visualization in edit mode to change the endpoint.
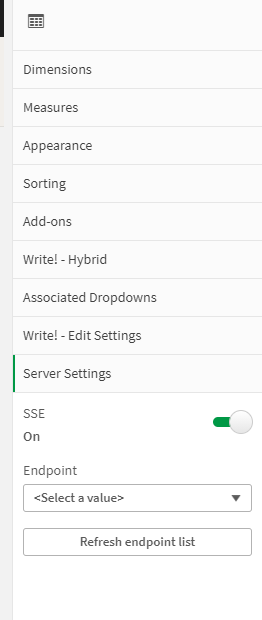
Therefore, navigate to the section Server Settings and select the correct endpoint.
Do this for the three visualizations Assign Actions, Show Assigned Actions and Create Your Own Actions.
9.Now assign an action to a user to test if the app is running correctly - this you see when the field MaxChangeCounterRulesWrite in the table ChangeCounter is 1 higher than before the reload.. As you did the first reload the value should be one.